Monday, October 31, 2011

Happy Halloween!

T.J. and I volunteered to host the CGSA (Communication Graduate Student Association) Halloween Party this year. It was so much fun! Not to mention I had an excuse to get a few more projects around the house finished and was able to decorate for Halloween more than I ever had before. More than anything though I was very impressed with the costumes that showed up at my door. I tried to snap a picture of all of them. Check it out.


 These two are Toad and Mario - 
and the talented Toad was able to create these costumes the day of! 
She made her hat and added to her sweater.


This Breakfast at Tiffany's costume was one of my favorites. 
It is amazing what we can do with clothes we already own.


I could not get enough of these two adorable penguins.


T.J. and I... as usual, disagreed on what we should be this year. T.J. got this mullet wig at a wedding earlier this fall, so of course he wanted that to be part of his costume. I went with a classic... 1950's housewife. I wore a dress I made a few years ago when I was going through my vintage clothing stage.

A party isn't a party without food...


I made these witch hat cookies (from here) using Keebler striped cookies for the bottom, and a Hersey kiss for the top. It is just held together with some orange frosting. They even won the prize for scariest food (in a category of one...)!


Sunday, October 30, 2011

Getting Spooky

This is the first year I have ever really decorated for Halloween. It was sort of fun and I wish I would have done it earlier in the month rather that just earlier this week. This also makes me think of how fun it is going to be to decorate the new house for Christmas... I can hardly wait! Take a gander at what I did below:


After the farmers cut down the corn in our "backyard" there were a few stray pieces left standing... well they aren't standing anymore. :-) Also... read more about my monogrammed pumpkin in yesterday's post. I brought this candle chandelier out of the bedroom and hung it in the living room for its spooky appeal.


Lots of black cob web and spiders. :-)


Spoiler alert: Pepperberry wall post coming soon....
I found this adorable spiderweb at Gordman's, a store here in Indiana that I recently discovered, for less than $10.


How all this deco got put to good use... tomorrow on Hems & Haws (Imagine that line being said as if it was an Oprah show promo...).

Saturday, October 29, 2011

Monogrammed Pumpkin


This year I opted for the least messy pumpkin situation I could think of... a no-carve, spray paint instead, monogram! In fact, I may give up carving pumpkins all together until I have kids. Why bother? I did sort of miss eating pumpkin seeds... but I can always carve this one up if I get desperate. Here's what I did:

First, I taped off our monogram, the letter H, using painters tape. I made sure to apply pressure to the tape so all the edges would be stuck down tight to the pumpkin.


Next, I took the pumpkin outside and applied a few coats of glossy black spray paint.


Once it dried, all I had to do was peel back the tape and viola....


I took the pumpkin around the house and put it in its rightful place... the front step.


T.J. was a little thrown off by the black at first... I think next year it would be cool to get a white pumpkin and spray paint it orange, then peel off the letter and have the white showing through... that would really get people thinking about what was going on. :-) Happy Halloween...

Stay tuned for 2 more days of Halloween inspired posts!

Thursday, October 27, 2011

Magnificent Medallion

This past summer I found this cute little chair at Goodwill for around $6. I originally bought it to sit at my vanity but decided to use it as a sewing desk chair instead. I painted it the same pink as the table I use as an office desk in my sewing room. It has been adorable pink but I was itching to stencil this pretty medallion design (Martha Stewart from Michaels and seen in this post on furniture in my sister's booth) on something. This chair was the first thing that volunteered for the job. :-) I described stenciling more in this post if you want to read about it, but I will briefly go through it again here.

 The key to stenciling is to use thick paint and to not load your brush with too much of it. You don't want the paint to bleed under the plastic of the stencil. This chair was a bit of a challenge because it was not perfectly flat. If you are a beginning stenciler, I suggest trying it on something flat first.


These special stenciling brushes (they have especially stiff bristles) are sold at Michaels or any other crafts store. I bought mine for 2 or 3 dollars. Make sure to hold the brush at a 90 degree angle to your surface. It needs to be held straight up and down to prevent paint creepage under the stencil. Just sort of dab it up and down (a technique called "pouncing") until enough paint is transferred to your surface. I tape my stencil down for extra security but if it is a small stencil you could get away with just holding it steady with your fingers. 
Carefully lift your stencil away and viola! Behold the stenciled chair.


Stenciling is such a quick and easy (not to mention cheap) way to dress up a piece of furniture. When I was stenciling with my sister a few months ago she told me she could remember my mom stenciling on chairs when we were younger... pineapples I think she said. It is so funny to me how these trends come and go. A few years ago I could not imagine I would ever want anything stenciled in my home. Now I love it! The more the merrier. I am working on some stenciled Christmas deco now... posts about that project soon!

This post is linked up to Sew Woodsy

Tuesday, October 25, 2011

Hipster Scarf

Today I made the easiest piece of clothing I have ever made. And I love it! Last night, while I was procrastinating I came across this blog post on comeonilene.com about these easy to make circle scarves.

They just take less than 2 yards of knit fabric. I happen to have just the piece to use...

I bought this pretty pink and sparkle striped fabric years ago and it has just sat on my fabric shelf because it is too thin to make a dress out of and I could not think of what else to make out of it. Eureka. It could be an amazing scarf. And now it is.


This scarf is super easy to make, as I've been saying. All I did was measure out 67 inches (because the blog mentioned above used pieces from 60 inches to 72 inches... so I went with an in between size) and cut along one of the stripes. I was left with a big rectangle of fabric. Then I just put right sides together and sewed down the opposite side of the fold. Because this fabric is knit the ends don't fray so just one line of stitches will do it.


That is seriously all there is too it. I right sided it out again, but the seam at the back of my neck and twisted it around. Sadly I was home alone when I snapped these pictures - so they are a little MySpace profile pic-esque, but you get the point. The scarf is cute.

  It can be worn single looped as well.

Sunday, October 23, 2011

More Tabs!

Introducing two new tabs today! 
I have been wanting to add a couple more tabs after I added the House Tour tab a few weeks ago, but I had to decide what I thought might be of interest to readers and fun for me to put together.


I decided on a Before and After Gallery - because who doesn't love checking out before and after shots, and a Tutorials page where you can easily access the links to different tutorials I have posted about. These tabs are located above this post in a white rectangle box with pink writing, below the "Hems and Haws" title and picture. Check them out and enjoy! Follow the arrows in the picture above to find where to click on the tabs.

Friday, October 21, 2011

Shiny and Bright Office Chairs

Months ago I picked up a matched set of chairs from Dicker n Deal in Lansing, MI.

 They were in rough shape but most importantly they were comfortable. I sometimes sit at my office table the entire day when I have lots of grading/paper writing/article reading to do. I needed some serious back support... and these guys have it. I love that the back is very retro and almost reminds me of a bow.
Once I hauled them home in the back of my tiny Mustang, I first wood filled the chips in the back of the chair.
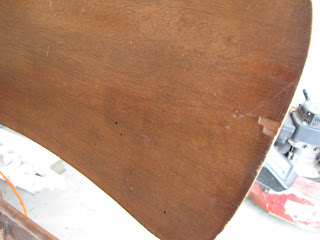
Chunk missing from the back of the chair.


 Here are my weapons of choice when it comes to furniture repair. Wood filler is super easy to use. Just squirt out a blob and rub it in with your finger. Let it dry 24 hours or so, then sand it down so it is smooth with the rest of the wood. You can see me smoothing it out in the picture above.


T.J. helped me glue the squeaky pieces of the chair. Now they feel very sturdy and strong.


Next I had to deal with the seat. I removed the seat by unscrewing the screws in the bottom of the seat that was holding it to the chair. If you noticed in the very first picture, the seat cushion was looking pretty gross. Stained and old. I used a pair of needle nosed pliers and what I think might be a knife used for fishing (I don't want to know) to get all the staples out of the existing fabric so I could pull it back and see what kind of padding I was working with. I put the knife under the screw first to loosen it, then used the pliers to pull the staple out. I was hoping to selvedge the padding and just recover with new fabric because the pad was pretty comfortable. Scroll down to see what I found...


Needless to say I pitched the padding and the fabric. It had to have been at least 50 years old, and smelled like it too! Once the seat was off and taken care of, I sanded down the chairs and smoothed out my wood putty further.


My chairs were ready to be painted. Only one problem, I was feeling indecisive about the paint color. I had originally thought black, then played with the idea of painting them the same color as my bedroom walls... a pretty gray. Then out of sheer laziness I took a look at which spray paint colors I had out in the garage. There was one can in particular that caught my attention... my metallic silver. I would have never imagined I would use it to paint a piece of furniture when I bought it but....

I decided to go with the silver metallic. I am sure this decision does not come as a surprise for any of you who know me... but honestly, I have been trying to keep the crazy on the inside a little since we moved into this house. Clearly I am not doing very well... Take a look at my sewing room. If this isn't crazy I don't know what is. What can I say? I love pink, I love things that sparkle, and I feel I should be allowed to "let my freak flag fly" as T.J. says, in my own house. :-)

I opted to use a spray primer on them first. I don't think I would have had to, but I did not have a full can of the silver and thought it might save me a few coats. In the picture below the chair on the right has a coat of silver on it, and the chair on the left has only been primed.


So the chairs are metallic silver. And I like them! Now I am stumped though on what fabric to use to recover the seats. I have two choices. My original plan was to use the fabric that matches my cork board frame, shown below. (See how I made it here).


I also happened to stumble upon an old curtain of mine that used to hang in front of the closet in my sorority house room. I have been holding on to it because it is beautiful and shiny, even though I knew I could not really use it for a curtain again. Check out this old picture of it I dug up. :-)


A few notes here: The curtain is not wrinkly like that anymore - it must have been straight out of the package! Also, this adds to my crazy argument before... my current sewing room is not the first time I have "pinked out" a room. Nor is it the second. In fact, my bedroom at home has bright pink walls, as you can see in the picture above my sorority house room was painted bright pink (the same can of pink paint I believe) complete with pink (of course) hand painted flowers by my oh-so-talented mother, and glittered by me. And don't forget the pink bedding. Crazy? I think so.


So I need help deciding. Flowers or stripes?


What do you all think? Any opinions out there?
Related Posts Plugin for WordPress, Blogger...