Showing posts with label easy DIY. Show all posts

Wednesday, July 24, 2013

Bow Ribbon Frames


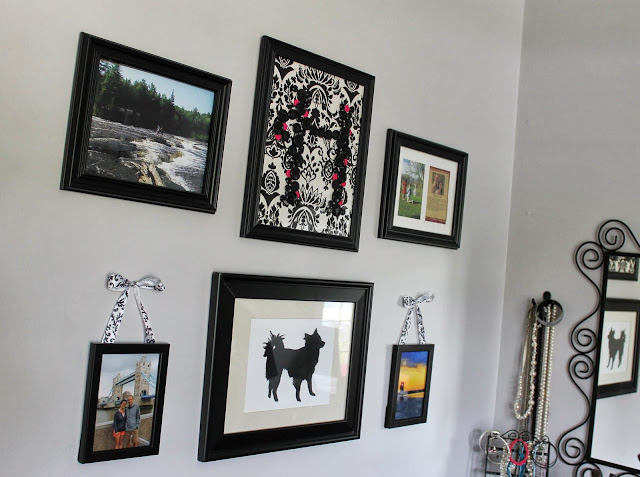
I have been looking for a tall and skinny frame or something to fill out my mini gallery wall in the bedroom. I was at Meijer with my sister awhile back and saw the cutest little black frames that hung from black and white ribbon. I thought it looked easy enough to do myself (even though the frames were only around $6 each) so I bought 2 $3 frames and a roll of ribbon which in retrospect cost me almost the same as if I had just bought the already made frames. Oh silly DIYing. But I was determined to just make them myself AND I found a roll of ribbon that matched the background of my button H frame (see how I made that here).


It was a super easy project. I just tied the ribbon into bows and secured the back with a little hot glue. Then I measured out the tails and glued the ends to the back of the frames (on an angle so they didn't hang funny).


Viola! The perfect fit for my gallery wall.


Sunday, March 10, 2013

Fifty-Thousand Page Views Later

50,000 page views. Unbelievable!

When I noticed the blog was approaching this milestone I thought about what I might want to do to celebrate. When I started the blog I would request to go out to dinner for every small milestone. :-) I will probably be doing that for this one too, but I also thought it might be nice to reflect on the projects that have actually made a big impact around the house. We have spent nearly 2 whole years DIYing this house, and some projects have definitely been more important than others (ex: a spray painted napkin holder = low impact). So check them out below, in reverse order, the most life-changing projects on Hems and Haws to date:
See the original posts about each of these by clicking the links.

5. My Office
While this wasn't necessarily one DIY project, it came together pretty quickly after we moved in. This room features a hot pink table for a desk, light pink walls, and molding near the ceiling that serves as a shoe rack. (Latest office post)


4. Painting the Trim
The trim in this house was atrocious. I'm not sure what it is about wood trim that I dislike so much, but everything just feels fresh and clean with white trim. There are houses where wood trim looks nice, but this was not one of them. There are still 2 rooms in the house with wood trim, but I am hoping to tackle those this summer. It is not a quick and easy job to paint trim, but it is worth it!  (Tutorial here)


3. The Bar
The bar is the most functional project we have done. T.J. was a huge help, and we completed the project in just about one weekend. We use the bar every single day and it has really upped the quality of life in our house by providing another surface to work/eat/hang out at. (Bar posts one and two).


2. Five Chandelier Projects
What makes these projects the runners-up is that they make me smile every day. All of these chandeliers cost me $30 or less - one of them I got for as little as $4 at a flea market in Lansing, MI. (Posts: White Kitchen Chandelier, ORB Hall Chandelier & Bedroom Chandelier, Pink Office Chandelier, Pink Closet Chandelier)


1. Painting the Kitchen Cabinets White
We spend a ton of time in the kitchen and as they say - kitchen renovations = big bang for your buck. Here I am not talking literal bucks, although I do hope the improvements we have made in the kitchen will pay off. The whole kitchen feels lighter and brighter with the white cabinets and they are a more recent change (1 year ago). The combination of white cabinets with white trim and white doors just makes everything feel updated, clean, and new. If you are considering this project, do it! Read about my experience here.

Monday, November 12, 2012

Easy Sunday Project

Today I whipped up some interesting and unconventional art for the bathroom. 


I found this giant H at Joann's for 10-11 dollars - but I used my 60% off coupon and got it for about $5. I used spray paint I had on hand. I was originally thinking a nice grey for the H, but T.J. suggested white. And I thought... why not. So we did. And I like how it turned out! Very unexpected in my color filled house. Good thing the shower curtain is bright and cheerful (fabric from my Mood trip this summer)!


I have been hard at work on this bathroom but it has been a slow process. I hope to have some sort of final reveal during Christmas break. As a sneak peek though - here is the light fixture I did. I got it for about $10 at the Restore - it was ugly gold. The mirror was $15 at Goodwill in MI.


Friday, July 27, 2012

How to Tie a Quilt

Today I bring to you the quick and dirty way to finish a "quilt" - which is in quotes because technically this is not a quilt because of the way it is finished. Perhaps you have seen these crazy t-shirt quilts before. This one I put together back in middle school in my mom's life skills class, so the shirts are from elementary and early middle school. I find it comical that 5 sports are represented considering I did not participate in any of them in high school. :-)


Anyway, it has been sitting around unfinished for a very very long time. Which is ridiculous, because finishing it only took me one episode of Pretty Little Liars! Why didn't I do this a long time ago?


So here is how it's done.

All you need is some yarn - just a couple yards is all it takes, and a giant needle. Mostly it just needs to have a big enough eye so that you can pull the yarn through.


This is what it should look like from the back:

After you have the needle threaded with the yarn you just stick it through the quilt (from the front to the back, then back up to the front again). Cut it so that each tail is about 2 inches long. Then tie in a knot. THAT IS ALL. SO EASY! Just do it over and over and over again. I chose to put ties in every corner between the t-shirts and around the edges between shirts. Special thanks to mom's hands for first teaching me, then demonstrating for the blog!


 Also - happy birthday to you mom! This quilt tying experience happened to fall on the weekend we were celebrating her birthday.


Saturday, June 30, 2012

Flower Headbands

So camp week on the blog got a little derailed due to other work obligations - but it is kicking back off now and will bleed into the beginning of next week. My sister, mom, nieces, and I are traveling to the Big Apple for the 4th - so I am sure I will have lots to report about that when I return. So anyway, at camp I helped out in the jewelry making class with the very creative Miss Chelsea Nimmo - she found all these ideas online and orchestrated the whole shebang. The first day of jewelry making we made these whimsical flower headbands.

Yes, I am wearing a flower in my hair in the woods. :-)
Chelsea bought strands and stems of flowers from the craft store, felt, and bunches of headbands and hair ties for this project. If you want to make these you will also need a hot glue gun and sharp scissors to snip the stem of the flower. Read more about how to make this project with a little different twist here - or read on.

I started with a black headband, then picked out the flower I wanted to use. I clipped the stem of the flower super close to the base so it would sit flat on my headband. Next I cut out two pieces of felt (the felt can either match your hair, the flower, or the headband) about the size of the base/green part on the back of the flower.


Next, I glued one circle of felt to the base of the flower with hot glue. (Thanks goes to the lovely camper who is demonstrating the process here.)


Then I held the headband up against the first piece of felt and hot glued the second circle of felt to the first one so the headband was sandwiched in between the two felt pieces. I was careful to not get too much glue on the elastic so that it could still stretch, but I think it would be ok either way.


That's it! Super easy. Here's the jewelry making class rocking our new headbands!


Monday, June 25, 2012

Camp Week

 I just survived another week of camp counseling... out in the woods and the elements and mud and dirt... you get the picture. But I love it for some reason (love, relationships, some may say God :-)). This year I ended up in the newest cabin which was nice, it still smelled like wood instead of stinky teenagers :-).

This week I will be blogging all about what I did at camp... which is surprisingly very DIY related. I was assigned to teach Fashion Design and I helped out in Jewelry Making and T-Shirt Time. I will share my adventures in each. To kick things off though I have a project I did before I left to help decorate my cabin. I whipped up these pennant flags a few days before I left. I took whatever felt I had laying around and cut them into triangles using a pattern I free-handed (on the back of a Joann's ad).


I tried to lay them out in some sort of pattern that was pleasing to the eye.


Then I took a hole punch and punched each edge at the top of the triangle. The punch wasn't strong/sharp enough to punch all the way through, but that ended up working out perfectly, it made a little half circle flap instead. I picked out thickish ribbon and strung it though each half circle - you can see the flaps on the light pink one below. 


I tried them out in my kitchen first...


And here they are in my cabin... I was a little worried the parents dropping their kids off would think I was unstable (a.k.a. pink crazy) but it must have been ok because they all left their kids!


Adventures in Jewelry Making on Wednesday, be sure to check back!

Saturday, May 26, 2012

Black Side Table


A couple weeks ago I decided I needed a place to display shoes near my bed... because I love nothing more than waking up in the morning to a beautiful pair of shoes. I thought about putting some shelves up near my vanity - then it hit me that I could just use what I've already got. Free and functional! This half circle table has been in our foyer since early last fall when my sister spotted it at a junk shop for $12. It had a bit of a country chic distressed look to it, which is not really my thing anyway, so painting it black just felt right.

To begin I took the table out to the garage to smooth out some of the distressing with sandpaper. I used 100 grit.


Then I gave it a few light and even coats of Rustoleum Semi-Gloss black. I also tipped it upside down to get those spindly legs from every angle.


Don't they just sparkle more on the black??


Friday, April 13, 2012

Colorful Milk Glass


My sister sent me this project she did recently to make her own milk glass vases. Very cool! I think the seafoamy green looks perfect with the rest of her house - especially the mermaid-beachy decor!

She found the directions on the Home Made Simple website - you can find the easy tutorial here (although hers turned out even cuter than theirs!).
First, pick a few vases - they can be found for $1 or less at any Goodwill. Then, choose your color - she used Martha Stewart paint (as you can see a few pictures below) and filled each vase with a good amount. The she tipped them upside down and swirled the color to cover the whole inside surface as it dripped out. Notice she held the vases back over the paint can so the excess paint would all be saved and could be reused for the next vase! She is one smart cookie.


Here they are up on a shelf with other clear vases. I think they look beautiful! She let them dry upside down for a few hours, then flipped them and they were ready to set out. I wonder how this would turn out in pink? :-)


How do you all feel about milk glass? I know one thing is for sure, it is even better in color!
Related Posts Plugin for WordPress, Blogger...