Showing posts with label sewing. Show all posts

Saturday, January 4, 2014

Easy Knit Dress

This dress is an incredibly easy Friday night/Saturday morning project.


Working with knit can be a challenge, but this dress was so straightforward and simple it was hardly a problem! I used McCalls 6886 for the pattern and the purple and black houndstooth fabric is from Joanns (I think). I used about a yard and a half. It took me a couple hours on a Friday night to cut it out and get it started and about an hour more Saturday morning to finish it up. It doesn't get better than that for a new dress!


Wednesday, November 27, 2013

Ruffle Bum

I have always been taken by things that are small. Baby clothes are no exception. I was so excited to hear that friends of ours were having a baby... for the sake of having a baby, but also because I knew it would give me an excuse to make them something. I was even more excited when I found out it was going to be a girl! The only tough thing about it was picking out which pattern to use. I ended up going with an "It's so easy it's Simplicity" pattern (A1826).


If you need to make a Christmas gift for a baby, I definitely recommend this one. I had to stop myself from making 5 more and hoarding them away in the closet for my own future offspring.


The process was pretty simple - you need just a little bit of fabric, bias tape, and skinny elastic. There is elastic around each leg and the waist. The ruffles were easy to make - this is where I deviated from the pattern a little. The pattern suggested having a raw top edge on each ruffle and covering it with ribbon. I assume they proposed this because making a tube out of fabric and turning it around is time consuming, but I just made fabric tubes (by cutting long skinny strips of fabric, folding them hot-dog style with right sides together, and sewing along the long edge), turned them right side out, and used those to make my ruffles. That way the top edge was finished. You can see the gathering but I thought it looked better that way than with oddly placed ribbon along the top of each ruffle. Below you can see my stitching lines for each ruffle and how the bias tape was used to make a casing for the thin elastic around the waist.


Such a fun little project! Sorry I do not have a picture of a baby actually wearing the diaper cover... I will work on that!  


Tuesday, November 12, 2013

Friday, July 26, 2013

Easy Tufted Cushion Tutorial


I have had these ice cream parlor chairs for a year or so and there was something just not quite cute enough about them... well I remedied that with these adorable tufted round cushions! I really had no idea how to tuft cushions so I just went for it in the way that made the most sense.

But first, I made the cushions. I found this fabric at Joanns and I thought the pink would match the front door pretty well. I want to say I spent about $7 or so on it. I bought half a yard and it worked... but it was a little tight. 3/4 of a yard would have been better. To get the round shape I took various sizes of plates outside to the chairs to see which seemed to be the right size. In the end I didn't have anything quite big enough so I ended up cutting about 1 inch extra around a large pasta serving bowl. In retrospect I should have cut them a little bit bigger than that because once I stuffed them they poofed up and were a little smaller than I had intended. The tufting did help with the poof though.


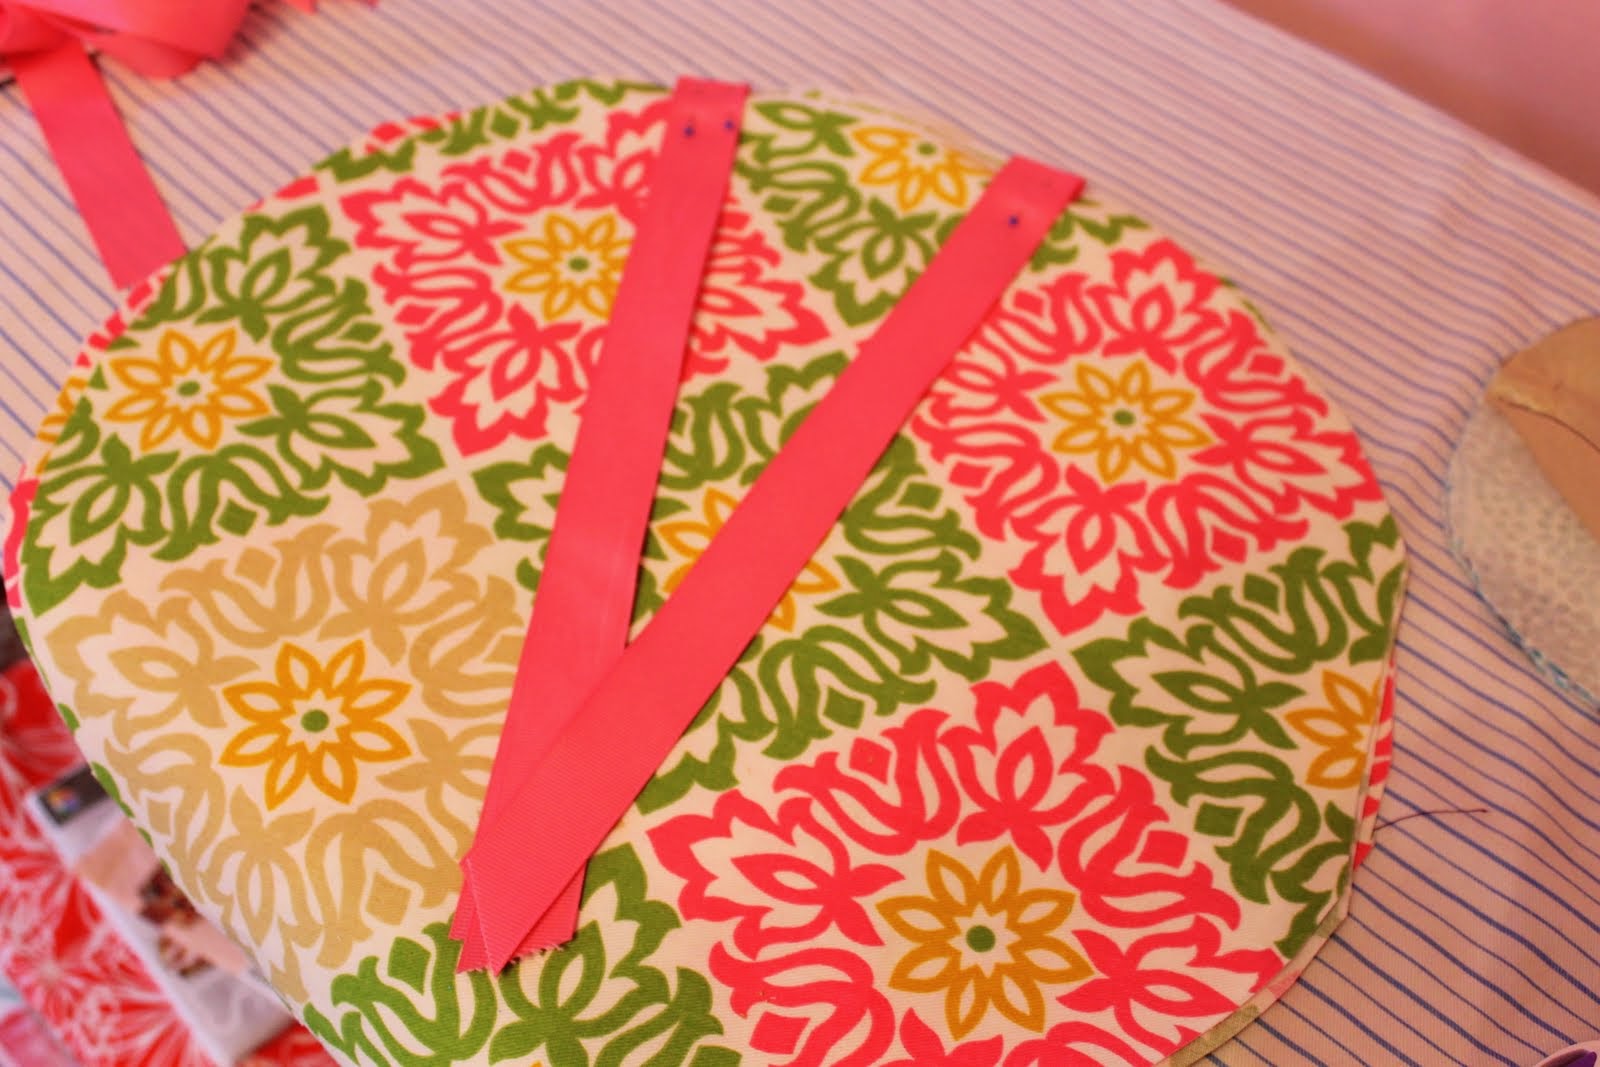
I picked some ribbon and laid the fabric circle on the chair to see where the ribbon would need to go in order to tie around the metal back of the chair. I pinned the ribbon in place on the right side of one circle (x2 for the other chair).


Then I simply put right sides together and sewed around the circle leaving the space between the ribbons open so I could flip it, stuff it, and sew it up when I was done.


After I stuffed them they looked like this (below). As I said, a bit poofy.


So then I tufted them! I picked 4 spots (the corners of the green medallion here) and went for it. I just tied a big knot in my thread and started from the back. I pulled really tight and went back through about 1/4 inch from where my needle came up and repeated that step 5-6 times. Sometimes I pulled the thread and knot right through the fabric but I just started again if that happened. I think this would have been even easier with small buttons because then the thread would be less likely to pull through plus it might have given an even more finished look to the cushion.


I think they turned out pretty cute! The porch looks more finished and I have an added pop of color. Definitely better than no cushion. 

... and they made for a nice prop in this recent anniversary pic.

Tuesday, July 16, 2013

Organized & Sophistated Sewing Room

The title should read organized and more sophisticated sewing room because despite the changes, I still have a bright pink table and chandelier. But as I am headed toward the dreaded 25th birthday and I finally had a false sense of some extra time on my hands last month, T.J. and I embarked on a big house project ripping up carpet and putting down new flooring in the sewing room, man cave, and guest bathroom. And of course, while the flooring was up I thought I had better paint the trim and doors, which lead to painting and reorganizing the sewing room.

I finally got around to organizing my fabric using comic book cards (see this post for details) like I had intended to do at least a year ago when my sister gave them to me!
Here is the nitty gritty before shot. I made myself live like this until I took the time to properly organize the fabric:


 And after:


 I also got around to making new curtains. The old ones were driving me a little mad with their circus-like dots and ruffles (see them here), although I do still love the fabric. Love/hate maybe. This new fabric is a linen-like print I bought a few years ago in Columbia, SC. I originally intended to make a dress with a pretty full skirt so I bought a lot of it - enough for full length curtains apparently. If I remember correctly this is the most I have ever spent on one piece of fabric, something like $40! Which really isn't bad for curtains...


Unfortunately I don't have a paint color to report here - I did something I am sure is #1 in the DIY handbook not to do - I mixed a bunch of grays + white + black that we had left over in the garage and hoped for the best! We had already spent a lot on the flooring and I really didn't want to go drop another $30 on a bucket of paint I knew I'd only use 1/2 of when I already had a bunch of grays in the garage. So I thought why not. What's the worst that could happen? I think it turned out okay although I won't ever be able to touch it up or replicate it and I ended up having just enough. It was very stressful when I thought I wouldn't be able to finish one of the walls and couldn't even go to the store to buy more. Yikes. Never again.


The organization process was honestly pretty time consuming which I think was made worse by my sitting on the floor to do the folding. If you can swing folding on your table that might be better. I was just enjoying the brand new floor! I refolded each piece of fabric and basically wrapped it around the comic book card (10 cents each). Pieces I thought were too big went in a different pile to be stored in the closet. I LOVE the way my fabric looks now. Much more inspiring and beautifully showcased. Now if only I had some time to play with it. 


One last thing... happy birthday to my mom today! 
Isn't she beautiful? I bet she made that vest herself too!

Sunday, April 7, 2013

A Long Awaited Trip to Ikea

Well, spring has sprung in the Midwest. And it has motivated me to get going on some projects. T.J. and I have been working in the yard and the garage as much as we can the past week or so and things are starting to come along. Outside updates will have to wait til they come along a little more though. :-)

Last weekend my mom came down for a visit and we traveled to the Windy City for an Ikea trip. This was huge for me because I have not even been to Ikea since buying our house. Which is absurd. My sister and mom kept going without me! But now I have finally gone again, and I can't wait to go back! That is the thing about Ikea - you have to travel to get there and without fail, as soon as you get home you think "shoot, I should have gotten that (one more thing)." I thought that about at least twenty things, but I will work with what I have for now! 

The project I completed first after I got home was making covers for the Euro pillows I bought there ($7 each, $10 for the polka dot fabric = $17 for 2 Euro pillows!)


Lola wanted in on the pillow making (and photo bombing) action.
 
T.J. calls it the Mickey Mouse bed - I think he might be right, and I like it!

 
I also picked up this awesome sun-shiny drum shade for the laundry room. Turns out I had overestimated the size of the laundry room, this thing looks huge in there! So I am coming up with a new plan and will share where the shade ends up soon. 


What have you all been up to this Spring? I am so ready for the semester to wrap up so I can jump into doing more projects and working on our garden.

Wednesday, January 16, 2013

Sewing Room Updates

My sewing room does double duty as my office. I am unbelievably thankful to have a job that allows me to work from home sometimes, so I really need a clutter free space to work and think when I need to. After Christmas gift making chaos, my sewing room was badly in need of some organization. So I took the opportunity to rearrange the furniture and start fresh. The room was just too full - so I swapped out my old sewing desk for a smaller vintage sewing table (with the original sewing machine removed from the inside), which created more space.


I have plans to paint the sewing table white or gray, 
but for now I am happy with the chevron fabric cover.  
I also switched out the knobs in front for two clear ones I found at Homegoods.


P.S. This is my 200th post! Can you believe it?
Related Posts Plugin for WordPress, Blogger...