Showing posts with label organization. Show all posts

Tuesday, July 16, 2013

Organized & Sophistated Sewing Room

The title should read organized and more sophisticated sewing room because despite the changes, I still have a bright pink table and chandelier. But as I am headed toward the dreaded 25th birthday and I finally had a false sense of some extra time on my hands last month, T.J. and I embarked on a big house project ripping up carpet and putting down new flooring in the sewing room, man cave, and guest bathroom. And of course, while the flooring was up I thought I had better paint the trim and doors, which lead to painting and reorganizing the sewing room.

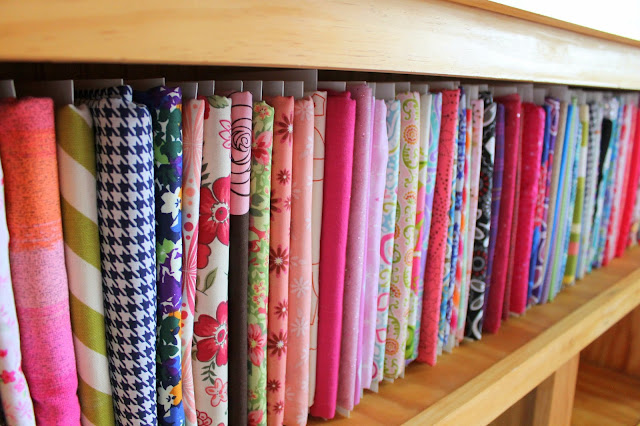
I finally got around to organizing my fabric using comic book cards (see this post for details) like I had intended to do at least a year ago when my sister gave them to me!
Here is the nitty gritty before shot. I made myself live like this until I took the time to properly organize the fabric:


 And after:


 I also got around to making new curtains. The old ones were driving me a little mad with their circus-like dots and ruffles (see them here), although I do still love the fabric. Love/hate maybe. This new fabric is a linen-like print I bought a few years ago in Columbia, SC. I originally intended to make a dress with a pretty full skirt so I bought a lot of it - enough for full length curtains apparently. If I remember correctly this is the most I have ever spent on one piece of fabric, something like $40! Which really isn't bad for curtains...


Unfortunately I don't have a paint color to report here - I did something I am sure is #1 in the DIY handbook not to do - I mixed a bunch of grays + white + black that we had left over in the garage and hoped for the best! We had already spent a lot on the flooring and I really didn't want to go drop another $30 on a bucket of paint I knew I'd only use 1/2 of when I already had a bunch of grays in the garage. So I thought why not. What's the worst that could happen? I think it turned out okay although I won't ever be able to touch it up or replicate it and I ended up having just enough. It was very stressful when I thought I wouldn't be able to finish one of the walls and couldn't even go to the store to buy more. Yikes. Never again.


The organization process was honestly pretty time consuming which I think was made worse by my sitting on the floor to do the folding. If you can swing folding on your table that might be better. I was just enjoying the brand new floor! I refolded each piece of fabric and basically wrapped it around the comic book card (10 cents each). Pieces I thought were too big went in a different pile to be stored in the closet. I LOVE the way my fabric looks now. Much more inspiring and beautifully showcased. Now if only I had some time to play with it. 


One last thing... happy birthday to my mom today! 
Isn't she beautiful? I bet she made that vest herself too!

Wednesday, January 16, 2013

Sewing Room Updates

My sewing room does double duty as my office. I am unbelievably thankful to have a job that allows me to work from home sometimes, so I really need a clutter free space to work and think when I need to. After Christmas gift making chaos, my sewing room was badly in need of some organization. So I took the opportunity to rearrange the furniture and start fresh. The room was just too full - so I swapped out my old sewing desk for a smaller vintage sewing table (with the original sewing machine removed from the inside), which created more space.


I have plans to paint the sewing table white or gray, 
but for now I am happy with the chevron fabric cover.  
I also switched out the knobs in front for two clear ones I found at Homegoods.


P.S. This is my 200th post! Can you believe it?

Friday, January 11, 2013

Luggage Organizers

My final Christmas gift post may be the best one... luggage organizers!


This is a great gift because it is useful and was inspired by a real life need. When I traveled to Orlando this fall for work I had very specific outfits picked out because it was a short trip and I had to look very put together. I wanted to keep my top, bottom, tights, shoes, and jewelry all together. Unfortunately, I did not have a good way to do it - so I used grocery bags. Super classy right?

So the idea for better luggage organization was born. I didn't have time to make them before my trip but I vowed to make something afterward. Since it was before Christmas I thought - who else is "crazy" enough to want to organize their lives to this extent? (Note: I use the word crazy with caution here - I admit that I am crazy, but I would never claim anyone else is crazy!) I remembered that my sister in-law often packs my nephews with outfits all folded together ready to go, so I thought maybe she could use some too. I ended up making her some for herself and for the boys. I think they will come in handy. I even had a couple requests for more from other family members when she opened them.


I used mine over Christmas break and they worked great. I might make a few that are even bigger next time. I used a serger to sew them together, but you could easily use a sewing machine. Depending on how big you want to make them, you just cut out one long strip of fabric with one end cut into a triangle - then fold up the bottom to about 2 inches below the start of the triangle and sew up the sides. This will create an envelope of sorts. I chose to add velcro for extra security, but I think they would be fine without it.


My measurements were: 21 inches tall from bottom to top of the triangle, 15 inches wide. The sides before the triangle cut were 16 inches tall, then I cut at an angle 9 inches - I realize this is confusing, so check out my equally confusing picture below. Really - just wing it, it will work out.


Are you crazy organized enough to use something like this?

Monday, January 7, 2013

2013 Resolutions


This year I am going to wear everything in my closet at least once. I have often thought of doing this challenge and I am finally ready to take it on - and to see what kind of crazy outfits I have to come up with at the end.


It took me a little while to figure out the logistics of this task. My first thought was just to rotate my clothes to the back as I wear them - but my closet is organized by color. So to avoid wearing black for a month straight, I came up with a different plan.


I decided to tag each hanger and once the item has been worn, the tag comes off. Each day I have to pick at least 1 tagged item to wear. I am only tagging the hanging things in my closet because I am sure I will wear all my pants etc. over the next 365 days. The total count is 130 items. Assuming I wear them one at a time, this will take me until May - just in time for summer clothes. My summer wardrobe is not currently hanging (I switch it out with my winter stuff each fall) so I will have to retag all of that when it comes out. I am looking forward to seeing how everything fits and hopefully donating the items I do not like or fit poorly. One more step toward clutter free living!


Other resolutions:
2. Eat less salt.
3. Lose 10 pounds.
4. Run an 8k.
5. Take better care of myself.


Maybe next year I will tackle the challenge of wearing all of my shoes over the next year. Watch out 2014. 
 
Wish me luck? What did you resolve to do this year?

Saturday, March 3, 2012

Inexpensive Fabric Organization

A couple months ago I found this idea for fabric storage on Pinterest. I followed it to the blog it came from which lead me to a company that sells fabric storage plastic cards - very cool and innovative. Only problem - they are way expensive (around 2 dollars each). Especially if you have a ton of fabric to organize. So I put this idea on the back burner thinking it will probably never happen and my fabric will continue to sit on shelves in my sewing room about to topple over.

I wish I was writing this post saying that I finally did something about it and my problems are solved. But I didn't. I do know someone who figured out a solution though.

My sister organized all her fabric this week using comic book cards. She found the idea on this blog and this method costs only 10 CENTS EACH! She found the comic books cards in packs of 100 for $10 at a local comic book shop in Lansing, MI. She bought the "classic" comic book style rather than the current - classic cards are 10.5 inches tall (current are smaller). It took her a whole day to do this much, but I think she would agree it was worth it. Maybe I will get to mine this summer... She recommends that the work is completely worth it!


This method even works for scraps.
Approximately 230 comic book cards later...
Related Posts Plugin for WordPress, Blogger...